

Your cabinets still open and close fine. The boxes feel solid, the layout works, and nothing is sagging. The problem is what you see every morning, a tired color, worn edges around the handles, and a finish that no longer matches the rest of the room.
That's the situation where cabinet painting in Austin, TX often makes sense. You don't need a new kitchen layout. You need the existing cabinetry cleaned, prepped, and coated properly so it looks current and holds up to daily use.
Table of Contents
- Which Cabinet Finish Service Fits Your Kitchen
- How Professional Cabinet Painting Works Step by Step
- Why Prep and Common Paint Problems Go Hand in Hand
- Paint Sheens and Topcoats That Suit Cabinets
- Keeping Occupied Spaces Safe During the Project
- Frequently Asked Questions About Cabinet Painting in Austin
- Request Your Free Cabinet Painting Estimate
Which Cabinet Finish Service Fits Your Kitchen
The short answer is simple. Cabinet painting changes the color of your existing cabinets without removing the boxes, so the layout stays where it is and you keep cabinetry that's still working well.
People often mix up five different services because they all promise a fresher kitchen. They don't do the same thing, and picking the wrong one can mean paying for more work than you need, or too little work for the condition of your cabinets.
Cabinet Finish Services Compared
| Service | What changes | Grain stays visible? | Best fit |
|---|---|---|---|
| Cabinet painting | Color changes with an opaque coat | No, the grain is covered | A full color change or a clean, modern look |
| Cabinet restaining | Wood tone changes while the grain stays | Yes | Wood you want to keep looking like wood, in a lighter or darker tone |
| Cabinet refinishing | Existing finish is stripped, repaired and recoated | Only with a clear or stained final finish | Worn, chipped or sticky finish that needs a fresh durable film |
| Cabinet refacing | New doors and drawer fronts go over existing boxes | Not applicable | Solid boxes with outdated doors, when the layout stays the same |
| Full replacement | Cabinet boxes and doors are removed and replaced | Not applicable | Layout changes, damaged boxes or structural problems |
Painting covers the grain completely, which is why it's the clear choice for a bold color change. Restaining keeps the wood character and shifts the tone instead, so it suits cabinets where the grain itself is part of the appeal.
Refinishing rebuilds a worn or chipped surface with a new durable film, rather than covering what's there. Refacing keeps your boxes but swaps the doors and drawer fronts, while replacement starts over entirely and makes sense when boxes are damaged or the layout has to change.
If the boxes are solid and the layout works, start by asking whether a finish change solves the problem before you consider tearing anything out.
Many Austin homes fit that pattern, from older houses in Central Austin to newer builds in Cedar Park and Leander where builder finishes date quickly. If you're weighing the options, our guide on whether to refinish or replace your cabinets walks through the decision in more detail.
An on-site look at the existing finish, door style, and box condition is what settles the choice. Photos help, but loose veneer, sticky old coatings, and water damage near the sink are easier to judge in person.
How Professional Cabinet Painting Works Step by Step
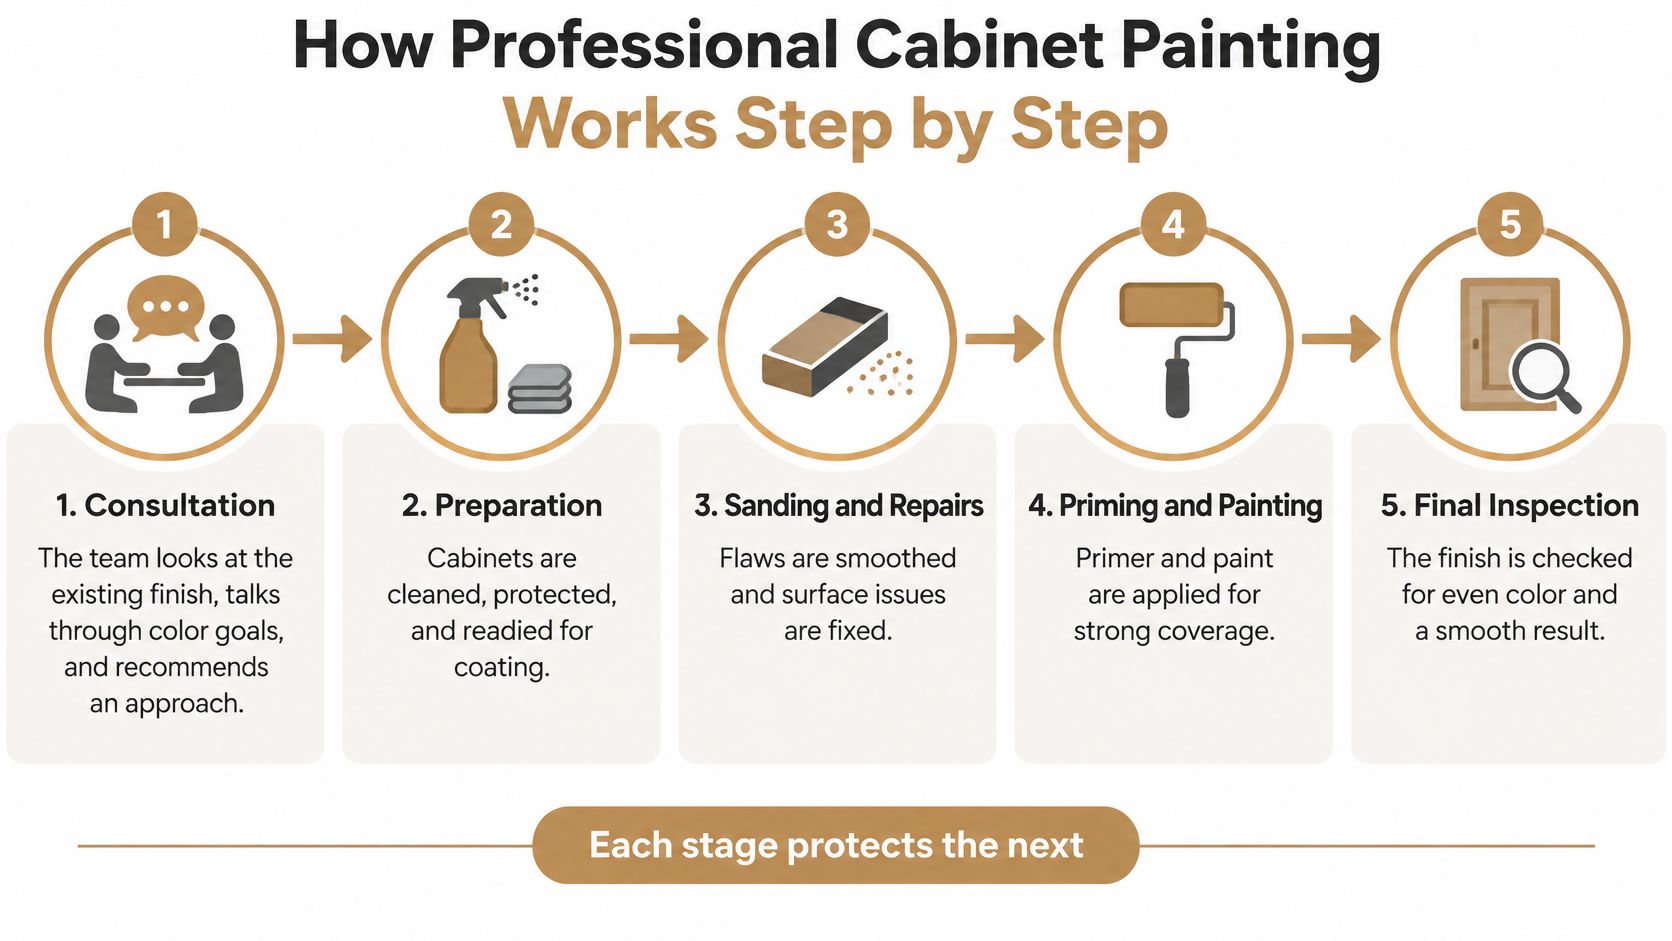
Cabinet painting follows five steps, consultation, color selection, preparation, priming and repairs, and finishing and reinstallation. Each stage protects the next, so skipping one usually shows up later as peeling, chipping, or uneven color.
The Five Stages
Consultation. We look at the existing finish, talk through your color goals, and recommend an approach for the doors and drawer fronts. Problem areas get flagged early, like peeling near the dishwasher or grease buildup around the range, instead of being discovered mid-job.
Color selection. You choose from the color options available, and the color gets checked under your room's actual lighting. A white that looks clean in a showroom can read yellow under warm kitchen lights, so this step prevents an expensive surprise. Cabinet painting can be done in virtually any color, which makes the lighting check even more important.
Preparation. Doors and hardware come off, surfaces are cleaned and dulled, and the work area is sealed so dust stays where it belongs. Fixed cabinet boxes are protected in position, and countertops, floors, and appliances are masked off before any coating starts.
Priming and repairs. Minor damage is filled, then a bonding primer goes on before the color. Primer is what grips the old finish and gives edges, the spots your hands hit every day, a foundation that resists chipping.
Finishing and reinstallation. The job ends with two to three sprayed coats, after which doors and hardware are rehung and aligned. Thin, even sprayed coats are what produce that factory-smooth surface, without brush marks catching the light.
For cabinets with a failed or heavily worn finish, the scope can overlap with a full cabinet refinishing approach, where the surface is stripped and rebuilt rather than coated over. We'd flag that at consultation if your cabinets need it.
What a Finished Job Should Look Like
A good finish is easy to check. Color should be consistent across doors, drawers, and cabinet boxes throughout the kitchen, with no door reading slightly darker than its neighbor.
Doors should close flush, gaps should look even, and hardware should line up neatly. If a door sticks, rubs, or sits crooked, that's a reinstallation issue, not something you should have to live with.
Run your hand over a door front. It should feel smooth and even, not gritty, tacky, or rough at the edges.
Why Prep and Common Paint Problems Go Hand in Hand
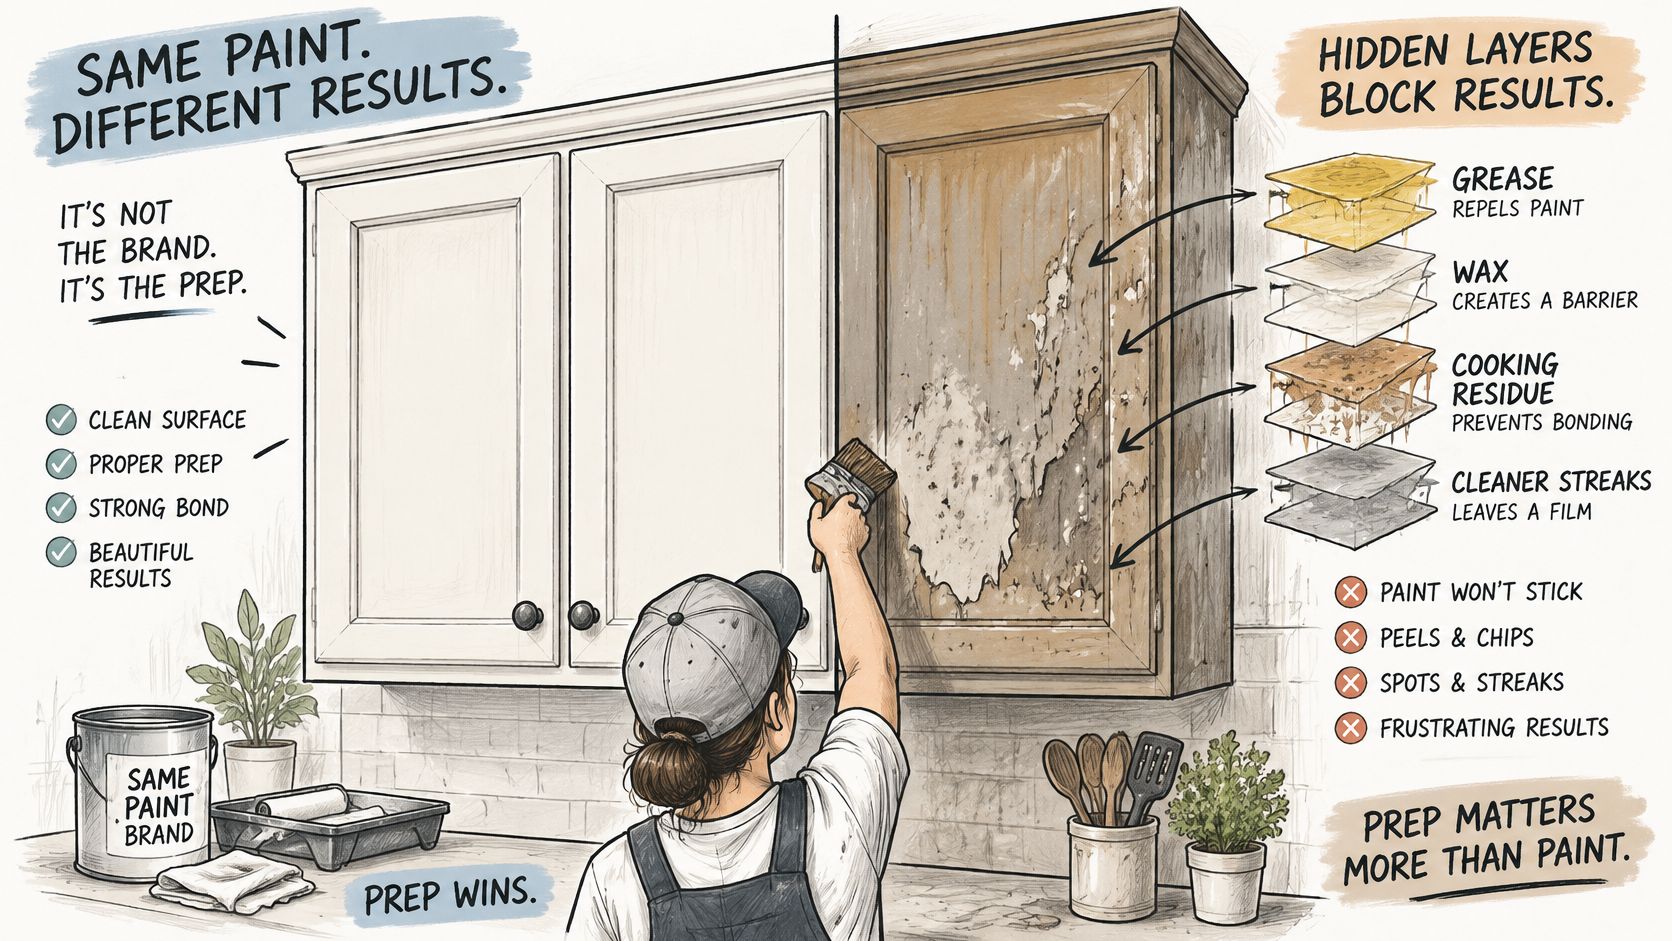
A door that peels at the top edge six months after painting usually traces back to one cause: the coating never bonded to what was underneath. Paint brand gets the blame because it's the visible choice. Surface preparation is the variable that decides whether any product, premium or budget, can grip at all.
Kitchen cabinets collect years of grease, cooking residue, wax, and silicone-based cleaners. Those contaminants lower surface energy, so primer and paint can't wet the surface evenly. The result is fisheyes, cratering, peeling, and early edge wear even with an excellent product in the can.
What Proper Prep Includes
- Remove doors and hardware. Painting around hinges and handles leaves weak edges exactly where wear is heaviest.
- Degrease every surface. Degreaser, a clean rinse, and full drying come before any sanding. Sanding over grease just drives it deeper into the surface.
- Dull glossy finishes. Scuff-sanding gives primer a mechanical grip instead of asking it to stick to a slick factory coating.
- Repair before coating. Paint outlines damage rather than hiding it, so loose veneer gets secured and small dents are filled before anything else goes on.
The door under your sink shows why this matters. It takes damp hands, drips, and constant contact, so its top edge is where a weak bond lets go first. Edges and high-touch spots get extra attention during prep for exactly that reason.
Cabinet Paint Symptoms, Causes and Fixes
| Symptom | Likely cause | Fix or prevention |
|---|---|---|
| Small craters or fisheyes | Grease, silicone or wax left on the surface | Degrease thoroughly before priming and coating |
| Peeling or lifting | Glossy surface not dulled, or weak primer adhesion | Dull the surface, use a bonding primer, and recoat |
| Chipping at door edges | Thin coat at edges and daily wear | Prime and coat edges fully and use a durable topcoat in high-use areas |
| Brush marks or uneven texture | Paint applied too thick or in poor conditions | Spray for a smoother film and control coat thickness |
| Yellowing over time | Unsuitable coating, heat or sun exposure | Choose coatings selected for cabinetry and protect from direct sun |
| Sticky doors or drawers | Finish handled before it fully cured | Allow full cure time before heavy use |
| Color that varies from door to door | Inconsistent prep or spray application | Use consistent prep and spray technique on every door and box |
Two of these symptoms fool people on timing and tools. A finish can feel dry to the touch within hours and still be soft underneath, so doors rehung too early end up sticky or dented. And spraying levels a surface beautifully, but it can't level over contamination. A fisheye sprayed is still a fisheye.
When you talk with any finisher, ask how they clean, dull, and prime edges, and how they'd prevent each symptom above. I'd listen for specific steps, not reassurance.
Paint Sheens and Topcoats That Suit Cabinets
Sheen is the amount of shine on the finished surface. It changes how your cabinets look, how easily they wipe clean, and how much they reveal small flaws in the wood or prep work underneath.
Common Cabinet Sheens and Where They Fit
| Sheen | Look | Cleaning and durability | Common use |
|---|---|---|---|
| Satin | Soft glow that hides small flaws | Wipes clean well and balances everyday use | Most kitchens and family spaces |
| Semi-gloss | Noticeable shine and crisp edges | Handles frequent wiping and moisture well | Door and drawer fronts with heavy hand contact, bars and commercial areas |
| Gloss | Highest shine that shows every imperfection | Very easy to wipe, but flaws stand out | Modern looks on well-prepared surfaces |
| Matte or flat | Soft and non-reflective | Harder to clean and can mark with scrubbing | Low-use decorative cabinets, less suited to busy kitchens |
Satin is the balanced choice for most homes because it forgives minor surface imperfections while still cleaning up well. Semi-gloss earns its place where hands, moisture, and frequent wiping are constant, like a busy family kitchen or a bar front.
Gloss looks sharp in photos but shows every dent and sanding mark, so it needs excellent prep. Matte looks soft and modern, but it marks easily and doesn't love scrubbing, which makes it a poor match for cabinets near a stove. Our overview of choosing the right cabinet finish covers how sheen interacts with color and light.
Topcoats and the Low-VOC Question
Over the color sits a protective topcoat, a clear layer selected for cabinetry that helps the finish resist hand oils, cleaning products, and knocks at door edges. We use professional finishing systems and protective topcoats selected for cabinetry, and commercial spaces like bars, restaurants, and hotel millwork often need a tougher topcoat than a lightly used home kitchen.
A low-VOC label alone doesn't tell you how a finish will perform on a cabinet door.
The EPA explanation of VOCs in household products makes the same point. Total VOC content does not necessarily indicate overall toxicity because individual chemicals differ in their health effects, and water-based acrylic systems are generally lower in VOCs than solvent-based products.
So ask different questions. What's the coating's intended surface, how durable is it under daily hand contact, and what's the ventilation plan while it cures? The right sheen and topcoat depend on how your cabinets are used day to day, not just how they look in a showroom.
Keeping Occupied Spaces Safe During the Project
Cabinet work in a kitchen, restaurant, hotel, or office isn't only a cosmetic task. Dust from sanding and vapors from curing coatings travel through doorways and HVAC returns into rooms you're still using, so containment and ventilation are part of the job, not cleanup extras.
The Basic Controls
The work area gets sealed off with temporary barriers so dust stays inside it. Exhaust fans push air outdoors rather than recirculating it, and the EPA best practices for indoor air quality during remodeling recommend maximum ventilation during the work and for at least 72 hours after paints or finishes are applied. Doors and hardware come off during preparation, surfaces are degreased and sanded, and the room stays fully contained. That containment is where most of the effort in an occupied home sits.
Keep children, pets, and other occupants out of the work zone until cleanup is complete. Where logistics allow, finishing doors and drawer fronts away from the occupied space cuts both odor and dust in living areas.
In restaurants, hotels, and offices, timing the work around service hours or quiet periods helps keep occupied areas usable. Food service spaces need extra care, since open food and prep surfaces can't share air with a sanding zone.
Older Buildings and Lead Safety
Age matters here. For renovation work that disturbs painted surfaces in covered pre-1978 housing or child-occupied facilities, the EPA Renovation, Repair and Painting Rule requires certified renovation firms and trained renovators to use lead-safe work practices, with specified containment and cleanup standards.
Cabinet repainting can involve sanding or scraping previously painted doors and trim, so the building's construction date and the condition of old coatings should be reviewed before prep begins. Lead-safe requirements may apply even when the project is limited to cabinetry.
Before work starts, three questions cover most of the risk. When was the building built, who will be on site during the work, and how will the room be contained? Clear answers tell you a lot about how carefully the project will be run.
Frequently Asked Questions About Cabinet Painting in Austin
Can cabinets be painted while we live in the home?
Yes, with the work area sealed off, exhaust ventilation running outdoors, and occupants kept out of the zone until cleanup is done. Plan on limited kitchen use while doors are off and coatings are curing.
How long does a project take?
It depends on the number of doors and drawers, the condition of the existing finish, and cure time between coats. A firm timeline needs an on-site look at your cabinets, so be cautious with anyone promising a schedule sight unseen.
Can I paint my cabinets myself?
You can, but prep and containment are where most DIY jobs fall short. Degreasing, dulling, dust control, and even spray application are hard to manage in an occupied kitchen, and that's exactly where professional cabinet painters earn their value.
Does my home need lead-safe practices?
Older homes should be checked before anyone sands or scrapes existing paint, especially where children are present. If your home's age or coating history raises the question, raise it before work begins, not after dust is already in the air.
Will the color match what I see in a sample?
Lighting and sheen change how a color reads, so a chip under store lights can look different on your doors at home. Ask whether a sample can be prepared first. For cabinet painting, a sample door can be prepared so you can see the color before the full job if you want it.
When can I use the cabinets again?
Wait for the full cure time and avoid heavy use until then, even if the surface feels dry to the touch. Follow your finisher's guidance on when to load shelves and start scrubbing.
Request Your Free Cabinet Painting Estimate
Every project is different. The right scope depends on your cabinets, the condition of the existing finish, the type of building, and the color or sheen you're after, which is why general figures found online rarely match what your kitchen needs.
The first step is a consultation. During a cabinet painting consultation, we look at the existing finish, talk through color, and recommend the right approach for your doors. If a sample would help you decide, we can prepare one before the full job.
Estimates are free and personalized. Quotes for cabinet painting can be requested through the online form or by calling (737) 341-9961, and you can also learn more about the service itself before you reach out.
What to Send Us
- Photos of your cabinets. Include a wide shot of the kitchen plus close-ups of any worn, chipped, or damaged areas.
- Door style and count. The number of doors and drawers, and whether they're flat, raised panel, or shaker style.
- The building's age. This helps us plan the right prep and safety steps from the start.
- Home or business. Tell us if the space is a house, restaurant, hotel, office, or rental, and whether it'll be occupied during the work.
We serve Austin, Round Rock, Cedar Park, Leander, Pflugerville, Georgetown, Lakeway, and surrounding Central Texas communities, for both homes and businesses.
There's no pressure to decide anything after the estimate. The first step is just a conversation about your cabinets and what you'd like them to look like.
If your cabinet boxes are solid but the finish has seen better days, RMK Contractors can paint, restain, or refinish them with the prep and containment a durable result requires. Visit RMK Contractors to request your free, personalized estimate and talk through the right approach for your kitchen.