

You open the same kitchen doors every morning, and the finish looks a little more tired each time. The layout still works. The boxes feel solid. What bothers you is the color, the worn edges, and a door style that belongs to another decade.
That's the situation where refacing cabinets with wood veneer often comes up. It can give you a fresh, real-wood face without removing sound cabinetry, but it won't fix a failing box or a layout you dislike. Knowing which problem you have makes the choice much clearer.
Table of Contents
- What Wood Veneer Refacing Covers and What Stays
- How Refacing with Wood Veneer Works, Step by Step
- Damage Veneer Can and Cannot Fix
- Refacing Versus Refinishing Existing Cabinets
- What Lies Under the Veneer and Indoor Air
- Which Option Fits Homes, Restaurants and Offices
- Common Questions About Wood Veneer Refacing
- Get a Cabinet Inspection Before You Decide
What Wood Veneer Refacing Covers and What Stays
A refacing quote can look simple: new doors, new drawer fronts, a fresh face on every frame. It changes the visible surface. Refacing cabinets with wood veneer applies a thin layer of real wood over the exposed faces, or swaps fronts for veneer-faced versions, while the boxes behind them stay exactly where they are. A new skin on a sound frame.
| Cabinet part | Usually covered with veneer? | Why |
|---|---|---|
| Doors | Yes, covered or replaced with veneer-faced doors | Most visible surface |
| Drawer fronts | Yes | Keeps color and grain consistent with doors |
| Face frames | Yes, with veneer strips | Visible front edges of each box |
| Exposed end panels | Yes | Side panels seen from the room |
| Cabinet boxes | No, kept | Structure stays sound and in place |
| Countertops | No | Separate surface, handled apart from refacing |
| Hinges and hardware | Usually replaced | Matches the new door style |
That last distinction matters more than the first ones. Refacing touches everything your eye lands on and nothing your dishes rest on. If the boxes are level, dry, and firmly anchored, the work concentrates where the wear shows.
How Thin the Wood Really Is
Decorative veneer is commonly made at a nominal thickness of approximately 0.6 mm, according to the FWPA wood veneer manual. That's roughly a few sheets of paper stacked together. It needs a smooth, stable base, because it'll follow bumps, chips, and loose finish instead of hiding them.
The species and grain give you the look, such as oak, maple, or walnut. The core underneath does the structural work. Keep in mind that a veneer-faced door is a manufactured panel: a real wood skin bonded to an engineered core with adhesive. The face is genuine wood, but what it's bonded to affects how the door handles moisture and how long it stays flat, so it's reasonable to ask the installer what the core and adhesive are before you approve the material.
Walk through your kitchen and note what you actually look at each day. If it's mostly doors, fronts, and exposed sides, refacing targets the right surfaces.
How Refacing with Wood Veneer Works, Step by Step
Refacing succeeds or fails on preparation and bonding, not on species alone. A beautiful walnut veneer won't stay flat over grease, dust, or a loose old finish.
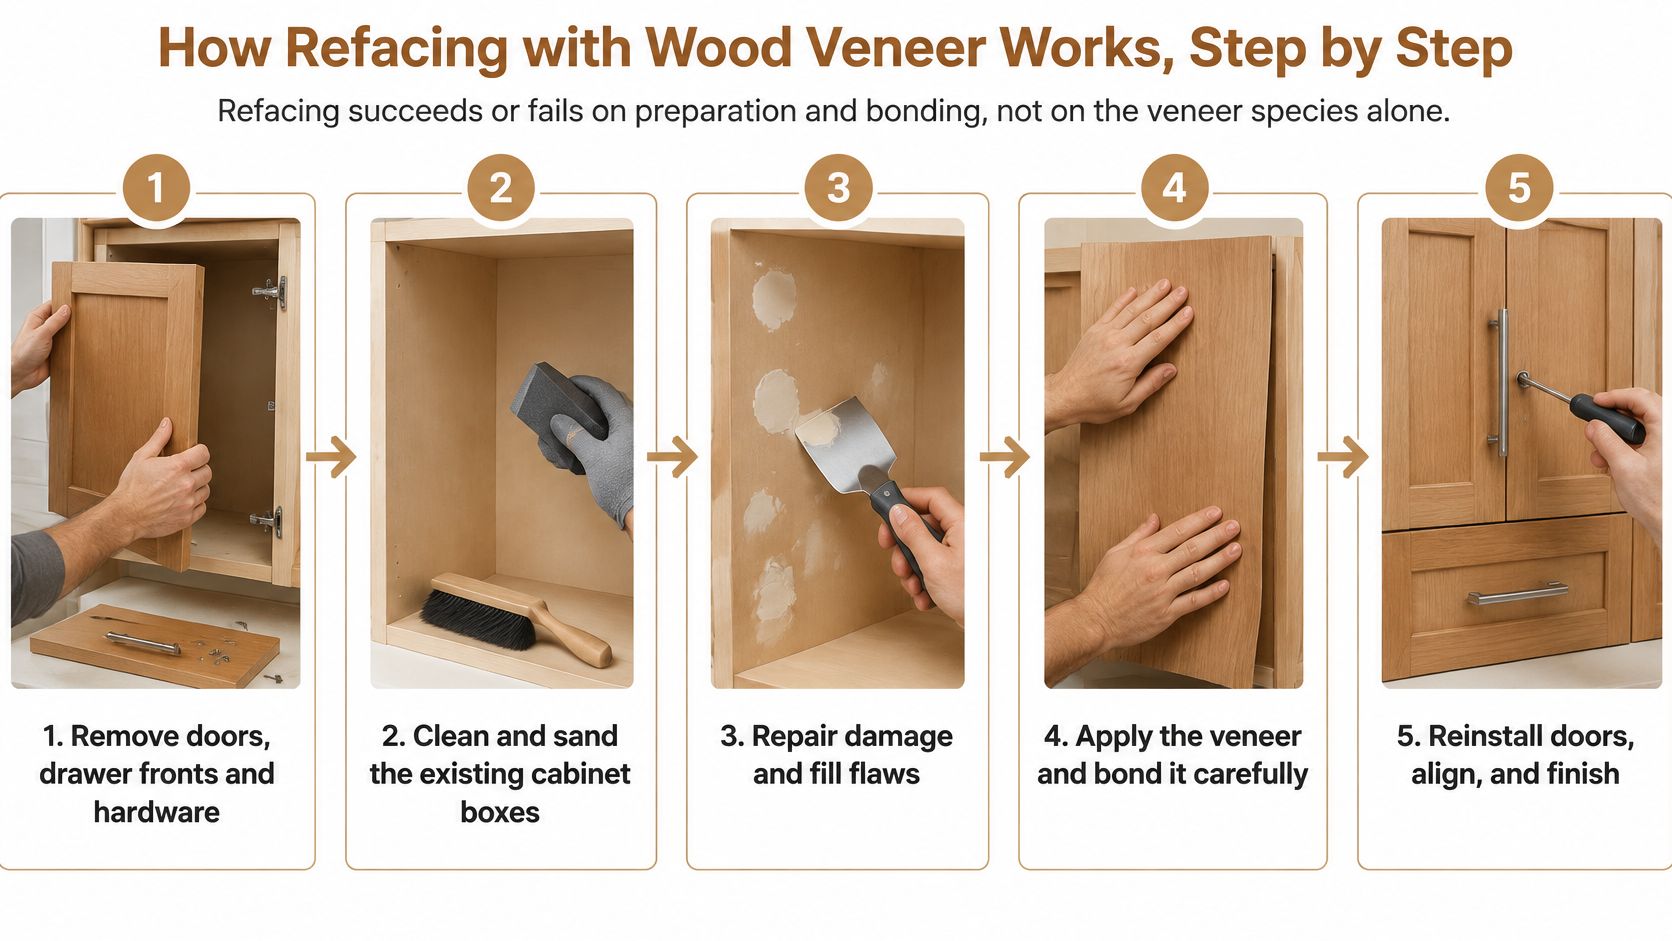
Preparing the Cabinets
- Remove and label everything. Doors, drawer fronts, and hardware come off first. Label each piece, because doors on a tall run are easy to mix up.
- Degrease and dry. Cooking oil near the range blocks adhesion, so surfaces are cleaned and left to dry completely.
- Sand and remove dust. The preparation sequence in This Old House's cabinet refacing guide calls for lightly sanding with medium-grit sandpaper and removing dust with a tack cloth.
- Check the base. It should be flat, dry, and free of loose laminate, dents, and old hardware holes. Veneer follows defects rather than hiding them.
Cutting, Bonding, and Finishing
- Cut with extra material. Face frame strips are cut with grain running lengthwise, about 1/2 inch wider and 2 inches longer than each stile or rail, as described in N-Hance refacing installation guidance. The overlap allows clean trimming later.
- Dry-fit and mark alignment. Contact adhesive grabs on contact, so you can't slide a strip into place afterward.
- Apply adhesive evenly. Follow the product instructions for coating both surfaces. The 3M contact adhesive technical data sheet specifies fabrication temperatures of at least 65°F (18°C) and warns that water-based contact adhesive shouldn't be assumed suitable for unbacked wood veneer without testing.
- Press from the center outward. Firm pressure pushes out trapped air, with extra attention at the edges where lifting starts.
- Trim and seal. Excess veneer is trimmed, exposed edges and end grain are sealed, and doors and hardware go back on.
- Add a protective topcoat. The finish needs to suit kitchen wear, steam, and regular wiping.
A good result looks simple: flat faces, tight seams, and edges that stay down. If you're comparing this with changing color only, our guide to cabinet painting in Austin, TX explains that different route.
Damage Veneer Can and Cannot Fix
The first question isn't which species you like. It's whether the damage is cosmetic or structural. Light wear on a sound core is very different from a swollen sink base.
| Damage | Can refacing fix it? | Typical response |
|---|---|---|
| Light scratches or surface wear | Yes, usually | Touch up or refinish the face |
| Small chip in a door | Often | Fill and touch up, or replace the door |
| Lifted edge on a sound core | Often | Re-bond and seal the edge |
| Bubbling or delamination | Usually not | Replace the affected panel |
| Swollen or soft box from a leak | Not with veneer alone | Repair or replace the box first |
| Out-of-square cabinet box | Not with veneer alone | Correct the structure before any veneer |
Where Problems Usually Start
Published guidance in the Vital Wood veneer selection guide notes that deep scratches or water damage may require replacing the affected panel rather than simple touch-up. That matters most at the sink base, around the dishwasher, behind the range, and in laundry or bar areas.
Bubbling, open joints, and lifted edges often trace back to contamination, thin adhesive coverage, cold working conditions, or uneven pressure. The veneer itself may be fine. The bond underneath wasn't.
Edge banding, sealed end grain, sink-cabinet protection, and prompt leak repair often matter more than species. Water looks for seams and exposed edges first, so those details protect the work long after installation day.
Practical rule: If a box is swollen, soft, or out of square, new doors will only dress up the failure. Inspect first, then decide.
Refacing Versus Refinishing Existing Cabinets
The one-sentence difference is this: refacing puts a new real-wood face on visible cabinet parts, while refinishing keeps your existing doors and gives them a new color or finish.
| Factor | Wood veneer refacing | Refinishing existing cabinets |
|---|---|---|
| What gets new material or finish | Visible faces: doors, drawer fronts, end panels, frames | Existing surfaces stripped, repaired and refinished |
| Change in look | New door style, species or grain possible | Same doors and grain, with new color, stain or topcoat |
| Core material | Veneer over a stable base, often engineered | Original cabinet wood or material |
| Tolerance of wear | Good for dated or worn faces over a sound base | Good for finish wear on solid doors |
| Tolerance of water damage | Poor when the box or core is swollen | Limited when the wood is soft or swollen |
| Disruption | Doors removed, new fronts fitted and trimmed | Doors removed for finishing, with drying time between coats |
| Best fit | New look or door profile, with sound boxes | Liking the existing wood, wanting a color change, doors in good shape |
How to Read the Choice
If you like your door shape and wood, but want fresh color, refinishing keeps the original cabinetry. Cabinet staining can also change tone while keeping grain visible. If the profile itself feels dated, or fronts are worn beyond a new finish, refacing offers more change.
Veneer can give you the appearance of a different species, but the core underneath still affects how the cabinet handles moisture and daily wear. Don't judge by the surface sample alone.
Both routes depend on sound boxes. For a broader comparison, see our discussion of whether to refinish or replace your cabinets.
What Lies Under the Veneer and Indoor Air
Natural wood veneer doesn't automatically mean low-emission construction. The veneer is real wood, but the core, adhesive, and replacement doors may be engineered materials such as hardwood plywood, MDF, or particleboard. Those products can contain formaldehyde-based resins.
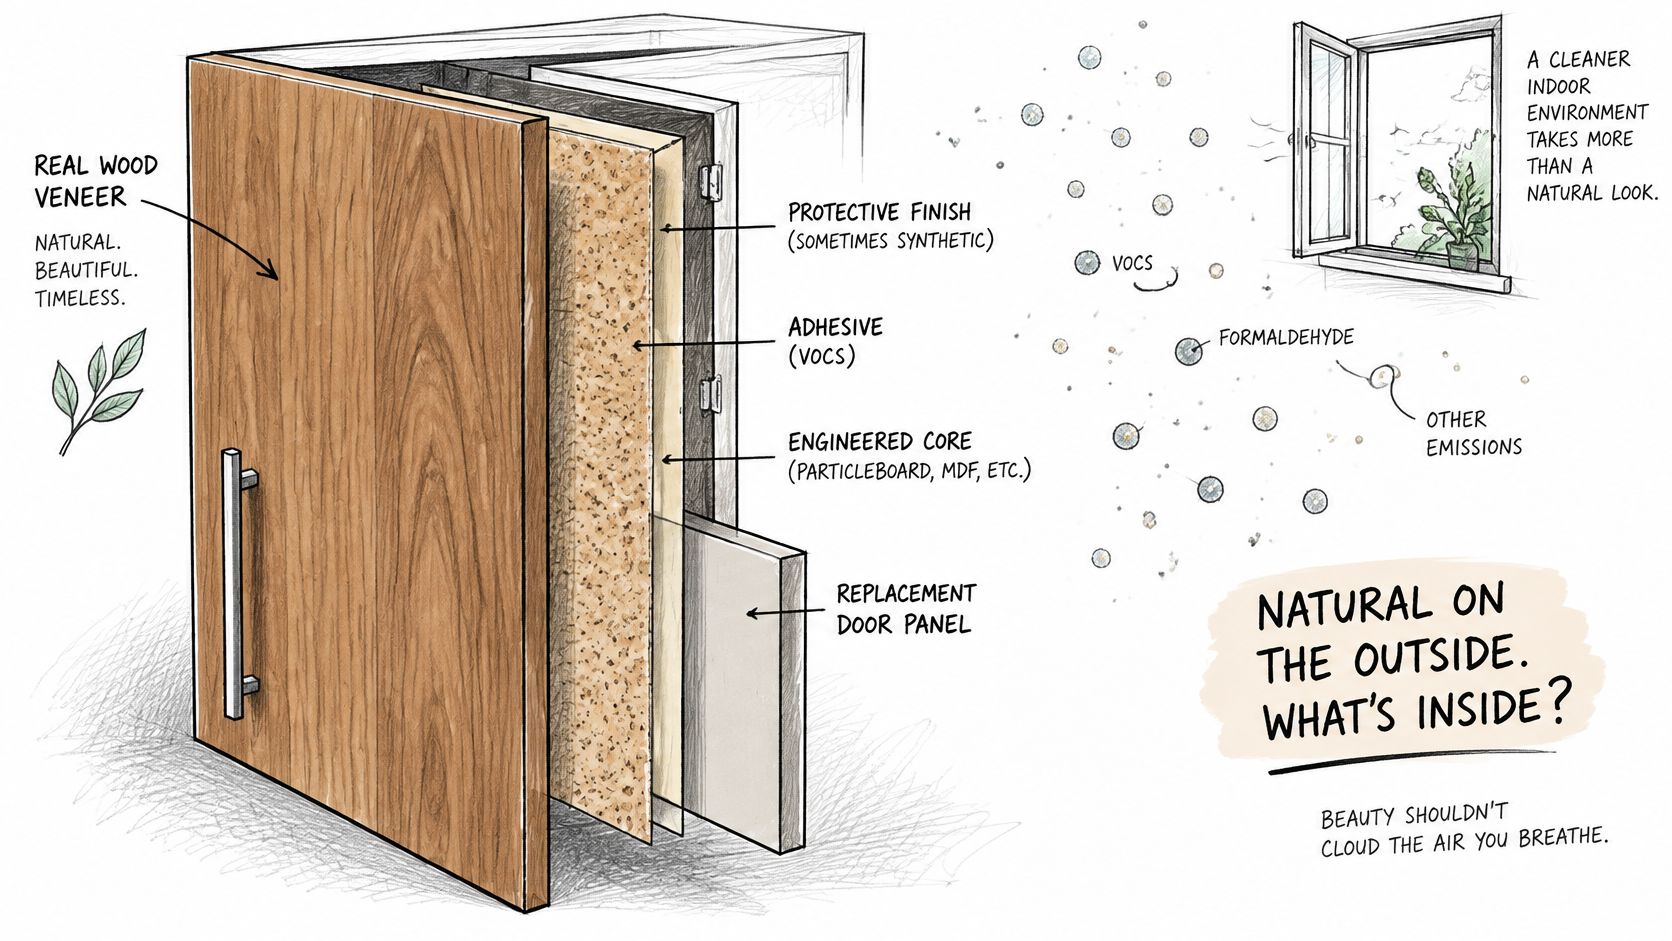
TSCA Title VI is the federal rule that limits formaldehyde emissions from composite wood products sold in the United States. The federal composite wood standards in the eCFR identify maximum emissions of 0.05 ppm for hardwood plywood and 0.11 ppm for MDF.
This matters most in tightly sealed homes, kitchens with limited ventilation, and commercial spaces that reopen right after installation. Ventilating during and after the work, and airing out the room before normal use, are sensible habits.
Questions Worth Asking
- Compliance: Are replacement doors and veneer-core panels TSCA Title VI compliant?
- Substrate: Which core material is being used under the veneer?
- Documentation: What paperwork covers the panels, adhesive, and finish?
- Odor: Should you expect any smell after installation, and for how long?
A good consultation covers material documentation alongside species, stain color, and grain matching. Appearance is only part of what you're buying.
Which Option Fits Homes, Restaurants and Offices
Start with the cabinet box, not the door. Homeowners with sound, dry boxes and tired fronts often get the clearest benefit from refacing. If the wood is still good and only the color feels dated, refinishing or cabinet painting usually fits better.
Restaurant and bar operators should separate cabinet fronts from heavy-use surfaces. Bar tops and tables that face constant spills and wet wiping are usually repair or refinishing work, while refacing suits cabinet fronts in dining or back-of-house areas, a distinction covered in caring for commercial wood surfaces.
Hotel owners should check bathroom and sink runs first; moisture there can outweigh a fresher face. Office, multifamily and retail managers often want one consistent look across many rooms or units, so ask how each batch of doors and panels is documented.
Common Questions About Wood Veneer Refacing
Does Refacing Mean New Cabinet Boxes
Usually not. Refacing keeps boxes in place, so it works best when they're sound, level, and dry.
How Long Does a Refaced Cabinet Last
That depends on box condition, daily wear, and moisture exposure. No honest provider can promise a specific lifespan for your project.
Can Refaced Cabinets Be Refinished Later
Light wear can often be touched up. A severely damaged veneer panel usually needs replacing, since there's very little wood thickness to sand.
How Much Does Refacing Cost
Every project is unique, so a personalized estimate gives you the useful answer. Contact RMK Contractors and we'll look at your cabinets and talk through the options with you.
How Should Veneer Doors Be Cleaned
Use a mild, damp cloth and dry the surface right away. Don't soak edges or seams.
Do the Doors Come Off During the Work
Yes. Doors and drawer fronts are removed, so plan for the kitchen to be partly out of use and ask how the schedule will run. Homeowners across Austin, Round Rock, Cedar Park, Leander, Pflugerville, Georgetown, and Lakeway often raise humidity and daily use early, and both are worth discussing.
Get a Cabinet Inspection Before You Decide
Work through this short checklist before choosing a method.

- Open the sink base. Look around the dishwasher too for swelling, staining, or soft board.
- Check alignment. Doors and drawers should close square, and boxes should sit level.
- Ask for documentation. Request details on the core, adhesive, and any replacement doors.
- Test the layout. Note whether storage and workflow still work for daily use.
- Name your goal. Decide whether you want a new look, a new door style, or the same wood with fresh color.
Your answers point toward refacing, refinishing, cabinet staining, or replacing only failed components. During a cabinet consultation, we look at the existing finish, talk through color, and recommend the right approach for the doors. The quote for cabinet restaining is free.
Gather your checklist answers and decide on your own timeline. There's no need to rush a choice you'll live with every day.
If your boxes are sound but your kitchen face needs new life, RMK Contractors can inspect your cabinets and explain whether wood veneer refacing, refinishing, staining, or painting fits best. Visit RMK Contractors to request a free, personalized estimate for your Central Texas home or business.