
Is the smoothest cabinet finish still the best choice if getting it means sealing off your kitchen, protecting adjoining rooms, and cleaning more equipment? That's the missing question in most spray gun vs roller comparisons.
For homeowners planning cabinet painting in Austin and Central Texas, the right answer includes more than appearance. You're choosing a complete process, including surface preparation, paint waste, containment, cleanup, and how the work fits around everyday life.
Table of Contents
- Spray Gun vs Roller at a Glance
- Finish Quality on Cabinet Doors and Trim
- Preparation, Masking and Cleanup Time
- Does the Method Change?
- Frequently Asked Questions
- Choosing the Right Method and Your Next Step
Spray Gun vs Roller at a Glance
A spray gun usually gives cabinet doors, drawer fronts, and trim the smoothest, most even finish. A roller is simpler to set up and easier to manage in an occupied home. Neither tool makes up for poor preparation or an unsuitable coating.
The useful comparison isn't which tool applies paint fastest. It's which method delivers the appearance you want without creating unnecessary work around it.
Spray gun vs roller on the criteria that matter for cabinets
| Factor | Spray gun | Roller |
|---|---|---|
| Finish smoothness on doors | Smooth, even film when set up well | Can show stipple, lap marks, or texture |
| Typical transfer efficiency | Conventional air spraying about 20–40%; airless about 35–50%, using typical ranges in EPA coating guidance | Direct methods such as rolling are often described as above 90% in the accompanying coating-technology guidance |
| Overspray in the room | Significant without masking and containment | Little airborne overspray |
| Masking and setup | Extensive protection, ventilation, and filtration | Lighter protection using drop cloths and careful edge masking |
| Speed on large flat areas | Faster on large, accessible surfaces | Slower across large areas because of repeated loading and edge cutting |
| Material use | Often higher; Engineer Fix estimated in 2025 that airless sprayers consume approximately 25%–33% more paint than rollers for the same coverage area | Usually lower waste |
| Prep and cleanup time | Longer application-specific setup and equipment cleanup | Shorter application-specific setup and equipment cleanup |
Transfer efficiency means the share of coating that reaches the intended surface instead of becoming overspray or other waste. It helps explain material consumption, but it doesn't measure finish quality.
A roller can put more paint directly onto a cabinet panel while leaving an unwanted texture. A spray gun can produce a finer-looking surface while requiring more surrounding protection. Those are different measures of success.
The ranges in the table are reference values, not a prediction for your kitchen. Cabinet shape, coating thickness, equipment adjustments, and operator technique all affect what reaches the workpiece.
Equipment and technique change the comparison
A spray gun isn't a single category of equipment. Conventional air spray, airless equipment, and high-volume, low-pressure equipment, commonly called HVLP, deliver coatings differently.
In comparable door-coating tests described in a technical coating study, experienced HVLP operators achieved transfer efficiencies approaching 70%, while novice operators reached about 60%. That finding illustrates why the operator and setup matter, not just the name on the gun.
A finisher needs to match the spray pattern to the part. A wide fan aimed at a narrow cabinet rail sends coating past both sides; excessive pressure can create more mist without improving coverage. Suitable fluid flow, controlled movement, and a properly adjusted fan help keep application focused.
Rolling has its own waste points. Paint stays in the tray and cover, drips need attention, and a poorly chosen sleeve can shed fibers that require sanding and recoating. Low overspray doesn't mean a careless rolling process is efficient.
Practical rule: Judge the complete job, including protection, application, correction, and cleanup, rather than timing how quickly someone covers a door.
For a kitchen with many removable doors, spraying can make sense because the finisher can arrange the pieces for consistent application. For a small fixed panel beside an occupied dining area, setting up a spray enclosure may create more disruption than the finish improvement justifies.
There's also the question of rework. If you dislike visible roller texture after the coating dries, sanding and recoating can erase the convenience of the original choice. If spraying is poorly contained, cleaning nearby surfaces creates a different problem.
Before choosing, mark the rows in the table that matter most to your kitchen. Prioritize the appearance you'll notice every day, the room you can realistically isolate, and the amount of household disruption you can accommodate.
Finish Quality on Cabinet Doors and Trim
Cabinet doors reveal application texture because you see them close up, often under strong window light or under-cabinet lighting. A finish that looks acceptable straight on may show ridges or uneven sheen when you look across it from the side.
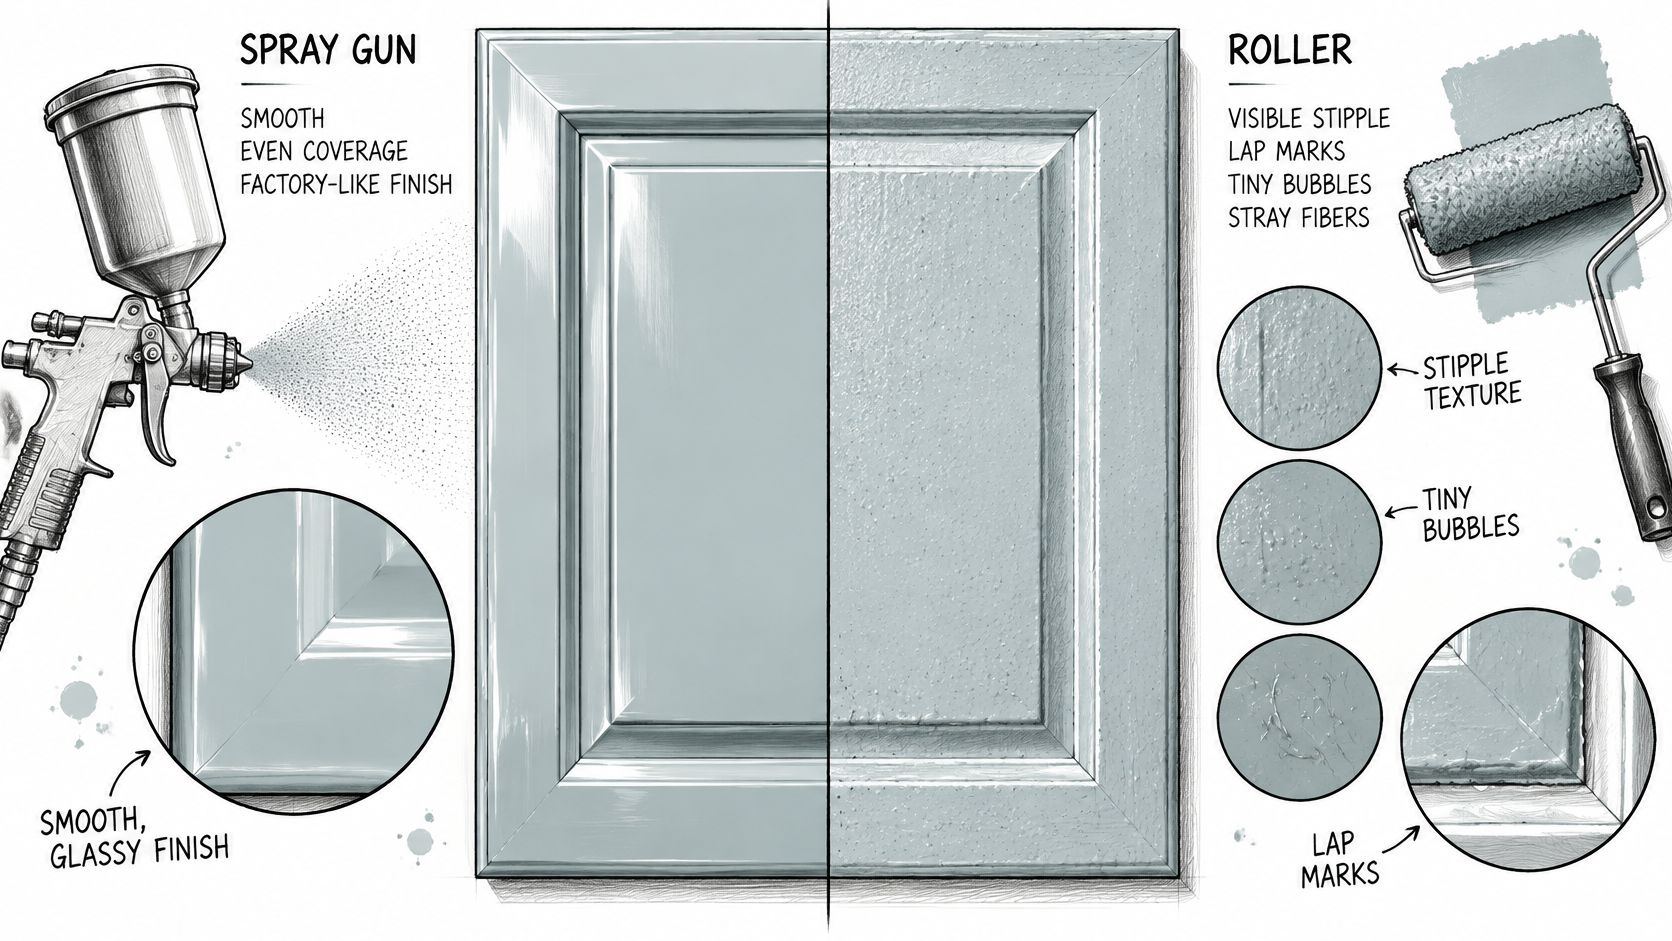
The visual difference between the methods is easiest to understand on a broad, smooth panel.
What creates the texture
A roller presses and releases wet coating as its cover moves. That contact can leave stipple, the fine pebbled texture visible after drying, along with lap marks, small bubbles, or loose fibers.
Cover material, nap length, paint viscosity, and rolling pressure all influence the result. A small roller designed for smooth trim is more appropriate than a wall roller with a deep nap, but even a suitable cover doesn't automatically produce a texture-free cabinet finish.
Spraying breaks the coating into droplets and deposits them without roller contact. The advantage is a more uniform film across the face, provided the droplets land wet enough to flow together rather than drying into a dusty surface.
Air Spray Technology's application guidance explains that excessive gun distance can cause dry spray and rough texture, and adjacent passes commonly start with approximately 50% overlap to maintain a continuous film. In practice, the finisher keeps a steady pace and consistent distance rather than swinging the gun in an arc.
Profiles need controlled application
Raised panels, grooves, and molded edges make rolling more awkward. A roller can bridge a recess while loading the surrounding edge too heavily, leaving the painter to correct it with a brush.
Spraying gives the finisher better access to those shapes, but flooding a groove isn't the answer. Recesses need deliberate coverage without building heavy wet edges that can sag.
At RMK Contractors, we remove the doors and spray the customer's chosen color over properly prepared and primed surfaces. Our cabinet painting process uses two to three sprayed coats, followed by rehanging and aligning the doors and hardware, with proper priming to help edges hold up to daily use.
For help deciding how color, sheen, and application work together, our guide to choosing the right cabinet finish provides useful context.
Before approving the finish, inspect a sample door in your own kitchen lighting:
- Face texture: Look across the surface from an angle, not just straight on.
- Edges and grooves: Check for thin spots, heavy buildup, and roughness.
- Color and sheen: Compare the appearance beside countertops, flooring, and nearby walls.
The target is a smooth, even finish that suits the room, not an unconditional promise that refinished cabinetry will be indistinguishable from a new factory-made product. Existing wood grain, old damage, and the condition of the doors still matter.
Preparation, Masking and Cleanup Time
Both methods start with the same problem: kitchen cabinets collect grease, cleaning residue, and wear. Painting over those conditions doesn't solve them, regardless of how neatly the color goes on.
Our preparation includes removing doors and hardware, degreasing and sanding the surfaces, and fully containing the room. Minor damage is filled, and a bonding primer goes on before the color.
The working sequence
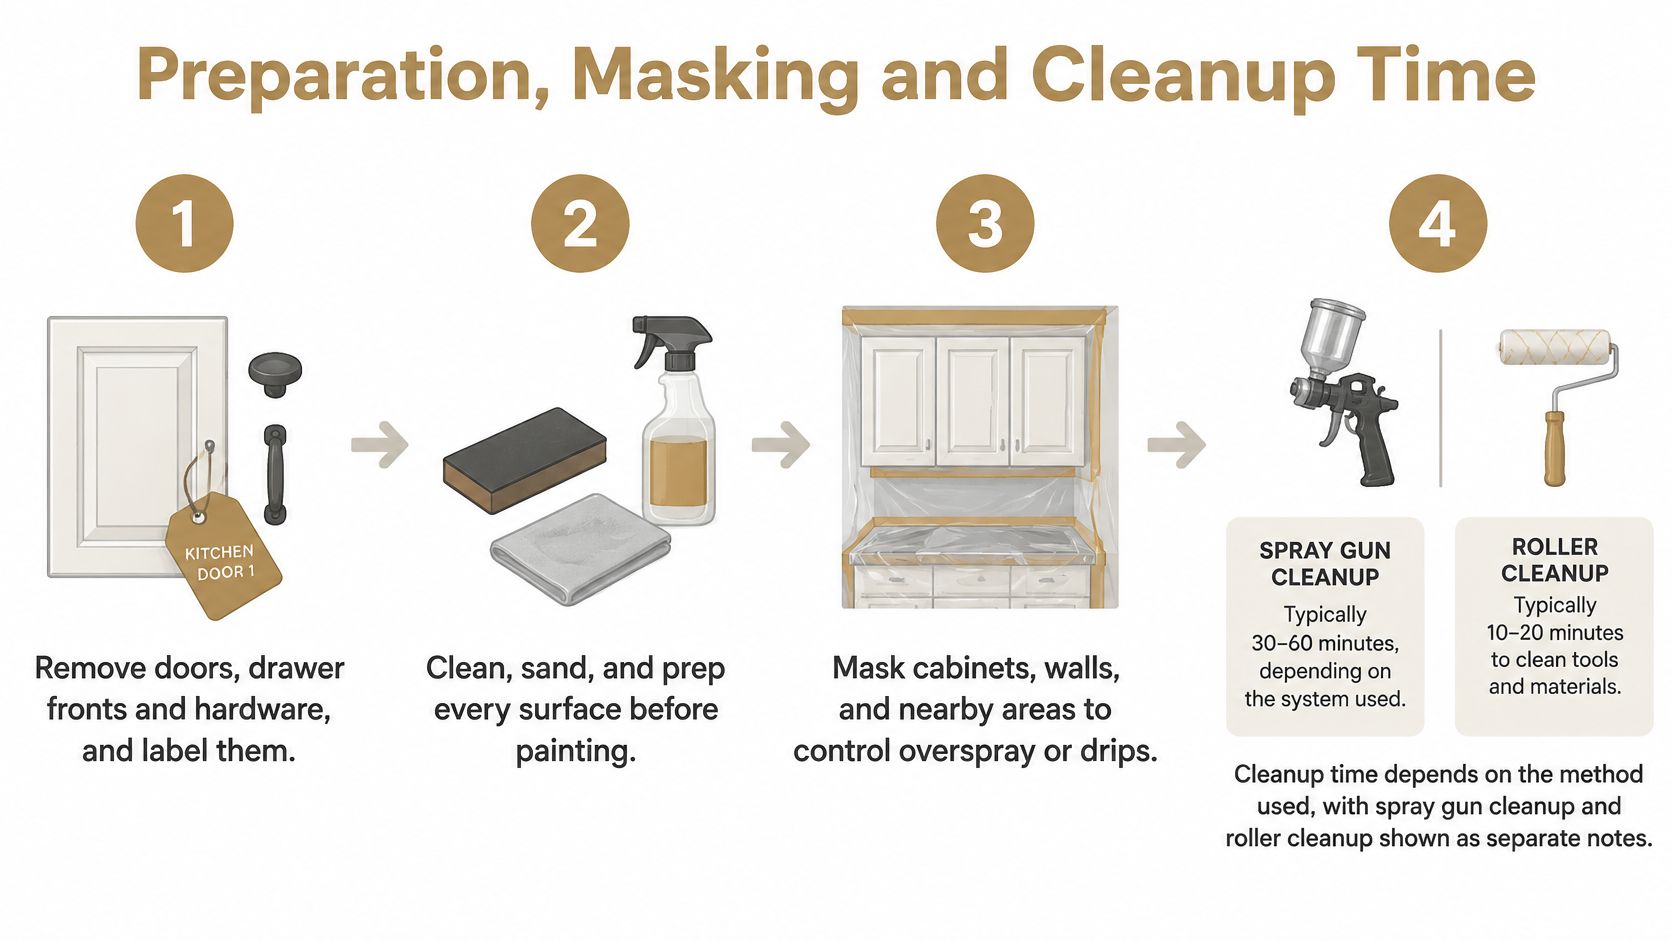
Remove and label the parts. Take off doors, drawer fronts, and hardware. Keep a location map and organize hinges and fasteners so everything returns to the correct opening.
Degrease, then sand. Clean contamination away before sanding so it isn't spread across the surface. Remove sanding dust before moving forward.
Repair and prime. Fill minor damage, smooth the repairs, and apply a bonding primer suited to the existing surface and finish system.
Protect and contain the work area. Cover floors, counters, appliances, and nearby walls. Spraying requires a more complete enclosure and an appropriate ventilation and filtration plan; rolling still needs drop cloths and protected edges.
Apply controlled coats. Use the chosen method without trying to force coverage through an excessively heavy application. Respect the coating system's drying and recoating requirements.
Reinstall and align. Allow the finish to set sufficiently for handling before reinstalling doors and hardware. Adjust the doors so their gaps and movement are correct.
A faster application method never replaces cleaning, sanding, repairs, or priming. Rushing those steps can leave an uneven-looking finish or weak adhesion beneath an attractive color.
The preparation and cleanup stages are summarized visually below.
Where the methods change the workload
An EPA paint-operations factsheet specifically notes that overspray can increase preparation and cleanup time. That's why a professional spray setup involves more than taping the countertop immediately below the cabinets.
Openings into adjoining rooms, nearby belongings, and air movement all need attention. Ventilation must suit the coating and its safety requirements; opening a window doesn't establish a controlled spray environment.
Roller protection can be lighter because there's less airborne paint. However, wet covers, trays, brushwork around profiles, and accidental drips still create cleanup work.
Spray equipment also needs thorough cleaning of its coating passages, filters, and application components. Masking must be removed carefully, collected debris contained, and the work area inspected before it returns to normal use.
For an Austin kitchen, agree on access routes and which areas will be unavailable before work begins. Our cabinet painting in Austin guide offers additional planning context for the project.
Does the Method Change?
Yes. Start by deciding whether you want to conceal the wood's appearance or preserve it. That decision changes the coating system before anyone selects a spray tip or roller cover.
Paint gives cabinetry a uniform color and hides the wood's natural color variation, although open grain may remain visible unless it's filled. Stain changes the tone while keeping the grain, and a clear finish protects the wood without turning it into an opaque painted surface.
When the grain stays visible
Transparent finishes make uneven application easier to notice. Heavy overlaps can appear darker with stain, while bubbles or lap marks in a clear coating can interrupt the sheen.
Spraying can distribute suitable stains evenly across doors and panels, but stain isn't always applied and left alone. Some products need wiping or other working-in steps to control the color; the coating system determines the correct sequence.
Open-grained or textured wood also needs special attention. Technical paint-application guidance identifies back-rolling as useful where sprayed material needs help entering pores or reducing pinholes, but that doesn't make it appropriate for every cabinet stain or clear coat.
- For visible grain: Consider cabinet restaining or wood refinishing rather than opaque painting.
- For porous surfaces: Establish whether the product calls for back-rolling, back-brushing, or wiping before application.
- For clear topcoats: Check a sample for bubbles, overlap marks, and sheen consistency.
Choose the sample before the method
We prepare cabinet-restaining samples in the customer's own wood species first. That matters because the same stain can look different on different woods.
Use a spare door or representative panel to evaluate color, sheen, and texture under your kitchen lighting. A light back-roll may help a compatible coating on porous wood, but it can also add texture you don't want on a smooth door.
Choose the finish system first, then the application method that suits it. Spraying is often the stronger option when the wood itself is the design feature, but it isn't a substitute for a representative sample.
Frequently Asked Questions
Can I paint cabinets while living in the home?
Yes, but plan room access and containment before work begins. Protecting the kitchen is only part of the arrangement; you'll also need to know how the project affects adjoining rooms, food preparation, and access for children or pets.
A roller on selected fixed surfaces may simplify the setup. A spray job requires a properly contained application area and a ventilation plan suitable for the coating, with reentry based on product guidance and project conditions. That containment work adds to the cost of spraying indoors, so weigh it against the finish benefit before choosing.
Do I have to remove the doors?
For spraying, removing doors usually gives better access to edges and helps the finisher control their position during application. It also keeps hinges and surrounding surfaces out of the coating path, and it lets the doors be degreased and sanded properly before finishing.
Some fixed panels can be rolled in place with careful protection. That doesn't mean leaving removable doors attached is the best way to finish the entire kitchen.
Does a roller always leave marks?
No. A suitable fine-finish cover, compatible coating, and controlled application can produce an acceptable result, particularly where a slight texture isn't objectionable.
Avoid pressing hard on a nearly dry cover or repeatedly rolling paint that has started to set. Thin, even coats should still meet the coating's required film build rather than being stretched too far.
Is spraying always the better choice?
No. A broad flat panel in a difficult-to-isolate room may be better suited to rolling than spraying.
The finish requirement matters too. If a small amount of texture is acceptable, there may be little benefit in creating a substantial spray enclosure for a limited area. Judge the method by the finish it produces and the prep, masking, and cleanup it creates around it.
How will RMK choose a method?
During the consultation, we review the existing finish, discuss color and the desired result, and consider the room layout before recommending an approach for the doors.
Bring photos of the whole room as well as close-ups of the cabinetry. The space around the cabinets can influence the recommendation as much as the door style.
Choosing the Right Method and Your Next Step
| Project situation | Better fit | Why |
|---|---|---|
| Kitchen with doors removed and an empty room | Spray | Best suited to a smooth, even finish on doors and drawer fronts |
| Occupied home with furniture and floors that cannot move | Roller for field surfaces, or fully contained spray | Rolling simplifies protection; spraying earns its keep only when the enclosure is complete |
| Heavily profiled or raised-panel doors | Spray | Gives better access to grooves and edges |
| Porous or textured wood surface | Spray and back-roll, or roller | Can help compatible coatings enter pores and reduce pinholes |
| Large flat panels or wall-like surfaces | Roller | Straightforward for limited flat areas, with limited masking and simple cleanup |
| Open-plan home with nearby air returns | Roller, or spray with strict containment | The ability to control airborne coating determines suitability |
| Tight schedule with many doors | Spray with professional containment | Supports efficient application across an organized batch of doors |
Match the process to the kitchen
I recommend spraying visible cabinet doors when the room allows a real application area: doors off, hardware labeled, a controlled spray zone, and protection that stays in place until the last coat cures. I would roll selected field surfaces when building that enclosure would disrupt the household more than the finish improvement is worth.
The deciding factor is the full cost of the choice. Spraying can deliver the smoother door finish, but it also asks for masking, containment, cleanup, and disciplined air control. Rolling can reduce overspray risk and simplify protection, but it may leave more texture on broad, lit surfaces. The right answer balances finish quality against prep time, paint waste, cleanup, and how much of the home must be closed off.
Start with these decisions:
- Appearance: How much texture will you accept under your actual kitchen lighting?
- Access: Which rooms and pathways can be isolated during the work?
- Finish goal: Do you want a solid painted color or visible wood grain?
- Disruption: Can the kitchen stay partly usable, or can it be cleared for a tighter spray setup?
Cabinet painting updates a kitchen without removing and replacing the existing cabinetry. If the boxes and doors are suitable for restoration, keeping them can avoid unnecessary replacement work.
That decision deserves its own evaluation. Our guide to refinishing or replacing your cabinets can help you assess whether a finish update addresses what you want to change.
What our process includes
Once the method is chosen, cabinet painting follows five steps: consultation, color selection, preparation, priming and repairs, and finishing and reinstallation. The practical output is a plan for access, masking, door handling, coating application, and reassembly, not a guess based on the tool alone.
Preparation means doors and hardware are removed, surfaces are degreased and sanded, and the room is contained. Minor damage is filled, a bonding primer is applied, and the finish is built in sprayed coats before doors and hardware are rehung and aligned. Reinstallation matters because doors need to open cleanly, sit evenly, and look consistent across the whole run.
We serve homeowners and commercial clients, including restaurants, hotels, and offices, across Austin, Round Rock, Cedar Park, Leander, Pflugerville, Georgetown, Lakeway, and nearby Central Texas communities. Commercial work needs the same method decision, plus a clear plan for furnishings, foot traffic, and how finishing fits around use of the space.
RMK Contractors offers cabinet painting, staining, refinishing, and professional wood finishing, with preparation and application selected for your surfaces and goals. Visit RMK Contractors to share photos of your kitchen and describe the finish you want, and we will recommend a practical approach for your doors and room access.